
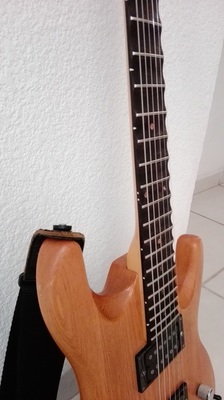
Scalloped fretboards are reputed to be well-suited to bending, vibrato and speed, and especially players with a light touch, the most famous exponent being Yngwie Malmsteen, though Ritchie Blackmore is known to scallop his fretboards to stop his fingers slipping off when bending, and I believe Steve Vai has the upper frets of some of his guitars scalloped. As you can see from the picture, the main advantage is that your finger doesn’t touch the fretboard, thereby speeding up and facilitating your technique. This is one of those things I’d been meaning to get around to doing. I had never played a scalloped neck before, but I had a sneaking suspicion that I would probably like it, and an old Samick laying around, so I went for it. Rest assured I didn’t just get some tools and start hacking away; I watched several videos, especially those by Claus Levin where he explains how to do it, what tools to use and so forth. With scalloping jobs costing between $200 – $300 dollars, it’s highly-tempting to just do it yourself.
To Scallop or Not to Scallop
If you’re interested in doing this, then you should bear in mind that the following qualities/items are a prerequisite.
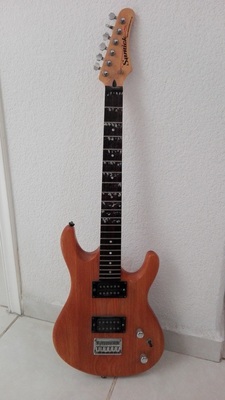
A Cheap Neck. Don’t do this to your main guitar the first time around, do it on an old guitar you don’t use or rescue one from a pawn shop and work on that. I did it on this Samick I’ve had knocking around since the late 90s when I found it in a guitar shop in Portsmouth, UK. To this day I have no idea what model it is, but now it’s a scalloped one, so if you recognize it let me know in the comments.
Patience. I’d place this above woodworking skills because to get it right, and avoid the temptation just to rush through it, requires a mammoth amount of patience from the outset. This is going to take you 3-5 days from start to finish the first time, so don’t get any ideas about starting in the morning and playing a perfectly scalloped fretboard by the evening.
Woodworking Skills. If you can use a circular file, you can scallop a fretboard. There’s not much to the scalloping technique itself, as you’ll see if you watch someone doing it properly. I’ll admit it does take a few frets to get a feel for it, but there’s no advanced carpentry going on.
Tools. You’ll need some round files (not the half-rounded ones). I used two different sizes, one being a little smaller in diameter to get closer to the frets; a couple of clamps to hold the guitar in place while you scallop, some fine sand paper to smooth out any roughness, lemon oil, rags, masking tape, and plenty of elbow grease.
Let the Scalloping Commence…
First, you should remove the neck and clamp it using a couple of vices (with cloths as buffers so as not to damage the neck), then put two layers of masking tape over each fret wire, scoring on either side so that you’re left with just the tape covering the actual fret wire. In his videos, Claus doesn’t do this, but I thought it would be a good idea to minimize any damage from dings with the file (and I was right).
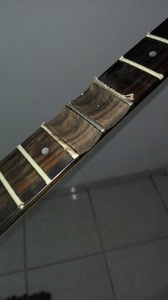
When you’ve taped up your frets, you’re ready to start scalloping. I started on the fifth fret as it had a dot marker which I read would disappear, so I thought this would be a good place to start to get the general depth right. For the filing itself, you don’t need to exert too much force as the file will do most of the work for you, just make sure you’re consistent across the fret.
Once I’d done the first two frets, as you can see in the picture, I relaxed a bit because it didn’t look half-bad. This is the fifth and sixth fret filed down to the level of the dot marker. You’ll see the tape held up fairly well, and certainly prevented a fair few dings. If you do accidentally ding the fret wire, don’t worry as I found the perfect tool for getting rid of most minor dings. You can of course start wherever you wish, or just do a partial scallop from the twelfth to the top fret, but since I’d already decided to do the whole fretboard anyway, I started in the middle.
From here on in it’s simply of question of patience as you start to get an idea of how long this is going to take, and it is time-consuming, I won’t lie. On the third day, I had done around thirteen frets which included a lot of inspecting, going back and leveling frets etc. Admittedly, I didn’t have all day to be scalloping fretboards, which was a good thing as I probably would have gotten impatient and botched it sitting there filing for hours on end.
After a couple of days or so I’d gotten thirteen frets done. I started to obsess a little about getting it perfect which meant spending copious amounts of time going back over the frets I’d already done, but I was happy with the outcome, especially for a first-timer. I didn’t go as deep on the first three frets as I did higher up the fretboard because I didn’t see the need. At this point I’d gotten rid of the tape or it had come off by itself. I did ding a couple of frets but was able to smooth these right off with (of all things) a four-way nail file, courtesy of my wife, that I came across in the bathroom. These have the unique feature of smoothing while also polishing the surface, so the fret wires came up ding-free and shiny into the bargain!
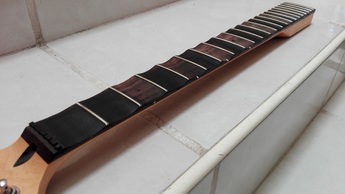
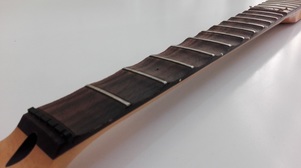
I found that the process sped up as I progressed to the higher frets through a combination of better technique and less fret to file down. I eventually finished and gave the neck a final once-over to make sure it was all pretty much level. Again, at this point you may start obsessing and filing down more than you probably should, so I managed to convince myself that it was fine and began to apply various coats of lemon oil. Before applying the lemon oil, I sanded each fret with a great flexible, sponge-type sanding block I found in Home Depot. In the picture, you’ll notice that the lemon oil made the neck significantly darker compared to the post-sanding color on frets 3, 5, 7, 9 etc. At this point I probably should have applied some kind of finish to the neck, but after much investigation I was still none the wiser as to which kind of oil to use, and the neck was smooth enough anyway after copious amounts of lemon oil.
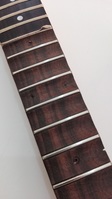
The frets that have markers are easier to file as you can hear when the file goes over the marker as oppose to when its on the edges. Most of the fret markers disappeared completely leaving some not so aesthetically pleasing holes on the fretboard as you’ll see in the picture. I did attempt to fill these with wood filler, but I didn’t particularly like the result and left them as they were; they don’t get in the way because your fingers never come into contact with them.
At this point the neck was playable, and after five days I was itching to try it out. If you have more patience than I do, you should probably apply a proper finish and do something about the dot markers, if only for the guitar to be more aesthetically pleasing and to protect the fretboard. So, I found some strings that I had lying around, which were probably 9s judging by the tension (I usually play 8s) and restrung her.
How Does She Play?
I have to say, I loved the feel of a scalloped fretboard, even a hack one like this. Bending and vibrato are an absolute dream, and it allows you to create so much more sustain on every note. Contrary to popular belief it is actually harder to play faster on a scalloped fretboard; I think I heard Yngwie Malmsteen also say this in an interview. I had read that chords go out of tune and that if you press too hard your notes will go sharp but found none of this to be true. If you press abnormally hard, or you have a ridiculously heavy touch, then you may find notes going sharp but other than that there’s no difference. It’s actually easier to grab chords on a scalloped fretboard, and I found that it really made rhythm playing much more comfortable for some reason. I don’t think you have to have a particularly light touch either as you can really dig in with those bends. It could be my imagination, but I found it transformed the tone of the guitar, made it much more resonant, and even fattened it up a little. I think this is more to do with the natural sustain you get from the scalloped fretboard.
The Verdict
I loved it, it didn’t take long to get used to and the painstaking process was very much worth it in the end. If you want to have a crack at this, don’t listen to the naysayers; it is something you can do yourself, just make sure you have the right tools and that you’ve done your research.