In Part 1 we looked at four of the most common scales used in blues soloing and how to learn them in positions. We also focused on learning the individual sounds of these scales and blending them to create more authentic-sounding blues licks and runs. While these scales are a great starting point, what we also need is some guide tones to negotiate the chord changes, a little trip down to the crossroads, and a way to really hone that transition from scales to licks that we began in Part 1.
3rds and 7ths
Blues kind of bends the rules as far as soloing goes, and to take full advantage of this, guide tones are essential for negotiating the changes and sounding like you know what you’re doing. If we take a blues in A, you can of course blow through the whole thing with the same scale, but what you need to do is make your playing more purposeful by you dictating what you want to play, rather than scale pattern putting its limits on your improvisational ideas.
The typical blues structure of I IV V in A means that the IV chord will be D7. To emphasize that chord change, the most interesting notes to land on are either the 3rd or the 7th; you could land on the root (D) too, but the 3rd and 7th really define the chord.
So, you’re blowing over an A blues and the A7 – D7 chord change is coming up; check out the following diagram where we go from the 7th of A7 (G) to the 3rd of D7 (F#) when the chord changes. Note that F# features in two of the scales we looked at in Part 1 (Major Pentatonic and Mixolydian), but not in the Minor Pentatonic and the Blues Scale itself.
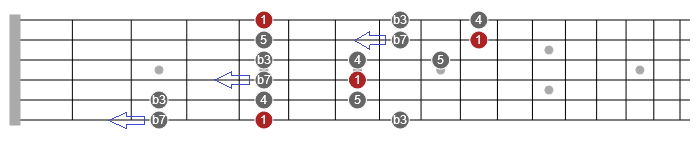
In this diagram, we go from the 3rd of A7 (C#) to the 7th of D7 (C). Again, the C note features in the Minor Pentatonic and Blues Scales, but not in the Mixolydian or Major Pentatonic Scales.

As you can see, there are various locations where you can make this subtle shift to highlight the chord change from A7 to D7, and your practice task will be to replicate it in the other patterns we learned in Part 1. Of course, you don’t have to target these notes as I suggest above, so feel free to use slides, bends, hammer-ons and pull-offs, or any other technique you know to make these transitions both from above and below the target note.
Pay Your Dues
Every noteworthy blues guitarist has paid their dues as far as learning from the blues masters goes. Some were fortunate enough to learn from their heroes first-hand or were exposed to their music from a very young age and became hooked. If you like SRV for example, a little research will tell you that his major influences were Buddy Guy, Albert King, T-bone Walker, Albert Collins, Jimi Hendrix and a host of others; while moving chronologically forward from SRV, you’ll find incredible players such as Kenny Wayne Shepherd and John Mayer to name just two. It’s a question of tracing those influences as far back as they go, and fortunately we can almost go right back to the source.
As you go further back in time into the lineage of the blues, you’ll discover a rawness that has become quite a contrast to the polished scalar sound of modern blues players such as Robben Ford and Eric Johnson. This improvisational rawness is what you want to get your ear around as the perspective it gives you, which is a long way from scales, is the essence of blues improvisation. Modern players focus on becoming better blues players on a theoretical and technical level, but listening to the earlier stuff it always seems to me as though they wanted to get better at expressing what was on their minds, rather than worrying about fancy licks; and this is the secret ingredient you want to add to your playing.
From Scales to Licks
In making the transition from playing scales to playing what’s on your mind, I really like to use the following exercise which involves taking any blues lick you like and using the notes in the lick to come up with as many variations on it as possible.
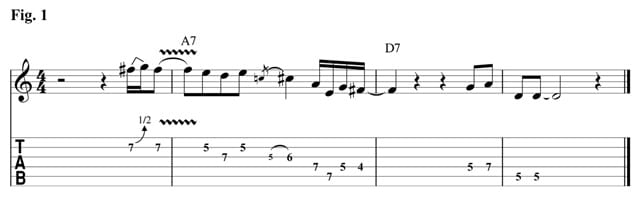
Here’s a lick that also includes the transition from A7 to D7 going from G to F# (7th of A7 to 3rd of D7). Play it as it’s written then start using this group of notes to come up with your own licks, preferably influenced by whatever’s on your (troubled) mind!
Phase 2 Practice Summary
To summarize, in Phase 2 work on really choosing the notes you play, refining your transitions between the I and IV chord, and then kind of forgetting it all to come up with your own licks while absorbing the raw sound of the early blues masters, and shifting your focus to playing what’s on your mind as oppose to technical flashiness or excessive quantities of notes.
Go to Part 3.