There’s no unwritten rule that says you have to use the entire fretboard when soloing, but if the music you play, or want to play, involves a great deal of improvisation, you’ll want to at least have the option of exploring other parts of the neck. Bear in mind that this is my way of seeing the fretboard, and while it may not be relevant to anyone else, I hope it will provide some insight into how to get around the fretboard, or at least how to put into practice all those scales and arpeggios you’ve been woodshedding.
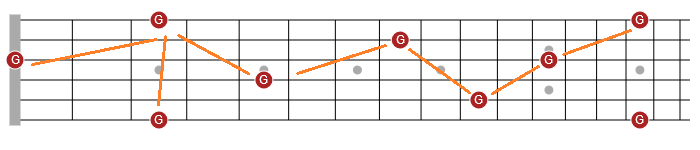
As I am heavily right-brained and non-visual, I have a tendency just to see the root notes of the tonality I’m soloing over; therefore, if I’m playing in some kind of G tonality the fretboard would look like this:
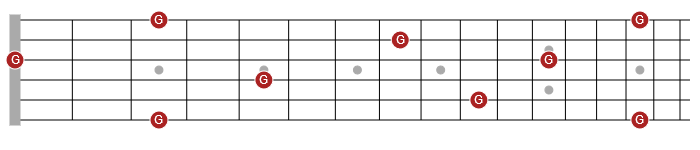
It goes without saying that you should have an instinctive knowledge of the notes on the neck; if you’re not quite there yet, check out this method. Seeing all the G notes in relation to each other is also fundamental for moving around the fretboard without getting lost.
In much the same way as an artist, I like to begin with an (almost) blank canvas, which is why I only see the root notes initially, leaving plenty of space for coming up with licks and runs.
Factors to Consider
Your improvisation should complement the music you’re improvising over, and hopefully take it somewhere, so next I would consider the style of the music, what kind of sound I want to get, how much time I have on each chord, the tempo, the feel etc. If you’ve been playing for a while, most of this will probably happen subconsciously but it needs to be considered.
How to Approach Improvising
Remember that there are many ways to approach an improvisation, which means that you can think in terms of scales, arpeggios, chords and melody, or a combination of these. I personally find it easier to navigate the fretboard using scales, though I do have an acute awareness of arpeggios so as to know which notes to emphasize or lean on. Your approach will most likely reflect what you’re most interested in on guitar; therefore, if you know a lot of chords, you may want to use chord tones and passing notes. If you’re more into scales, then your improvisational brain will be wired to think in terms of scales and patterns.
The Rub
Whatever approach you use is always going to be secondary to the purpose of improvising which is (hopefully) to reproduce the sounds you’re hearing in your head. Scales, arpeggios, and chords are only the means to do this. A lot of players treat them as the purpose which is why very few players’ soloing skills really stand out. In other words, you have to go beyond the means, or use them, to get the sound you want to hear. If this sounds like a tall order, don’t be put off; another way to look at this is practicing scales, arpeggios and chords so that they become second nature. When something is second nature to you, it can be called upon in an instant and you have a certain, if not absolute, degree of control over it; this is where the magic happens!
In terms of the diagrams above, this means you’re able to conjure up say… a Lydian vibe by going from one G note to another and picking out the pattern or the notes that will give you that sound. If you have to stop and work out how to do it, then it’s not second nature… yet.
Test Yourself
You can test how much of your knowledge is second nature by picking a scale, mode or arpeggio and seeing how well you can move around the fretboard from G to G with it. It’s okay to have the patterns in the back of your mind, as long as the major part of your focus is on the sound you want to create. If the pattern is dictating the sound, it’s not second nature yet. Start with the major and minor pentatonics, perhaps the blues scale, then bring in the modes of the major scale, and any other scales you know.
Dealing with Chord Changes
Improvisers that generally sound like they know what they’re doing are usually following the chord progression and picking out the ‘right’, or harmonically satisfying, tones to land on when the chords change. Here’s where your knowledge of music theory comes in if you want to (coldly) calculate which notes to land on (usually the root, third or seventh). For example, if you’re going from A7 to D7 in a blues then it will be most harmonically satisfying (for you and your listeners) to land on an F# because a) it’s the third of D, and b) the b7 of D (C) may have already been played over the A7 chord. I prefer a freer approach where the only thing in my left brain is going from an A root fretboard layout to a D one; sometimes you land on your feet, sometimes you don’t, but in any case, remember that you’re only ever a half-step away (either side) from a ‘right’ note. This ‘blank canvas’ approach also forces your ear into action and helps you shift away from relying on patterns.
The Tasty Intervals
The tasty intervals are the term I use for intervals such as the b2, #4, b6, 6. b7, 7, and are the ones that I can hear the effect they’ll have on the line I’m playing, and can be used on purpose to create tension and outside sounds.
How to Develop these Ideas
If you want to take this kind of thinking further, then check out the article, ‘How to Create Melodic Guitar Solos’, or the accompanying book, ‘Melodic Soloing in 10 Days’, which look at soloing from the point of view of intervals as oppose to patterns, scales and modes.
If you’re interested in the ‘blank canvas’ approach to improvisation, check out the book, ‘Let Go of What You Know – How to Improvise Freely on Guitar’.